Showing posts with label crafting. Show all posts

Monday, October 3, 2011

Bunting for baby

You know when you meet someone for the first time and you can just tell you're going to become good friends? That's how I felt when I met Kirk and Sara. My husband and I were only introduced to this lovely couple about 9 months ago,  but we've already become kindred spirits. Kirk and my husband are big music nerds who can geek out for hours over recording equipment, while Sara and I share a love of good food and crafting (we have actually just started a knitting circle, which I will get around to blogging about someday).

Shortly after we met them, Kirk and Sara told us they were expecting their first baby. It's been fun and exciting to watch Sara's belly grow and tag along with the whirlwind experience of cooking up a little person.

A few weeks ago, I had the pleasure of attending Sara's baby shower. It was a special gathering of close friends and family only, so I was so thrilled to be invited. I wanted to give her something practical that could be used everyday, but I also wanted to give something special and homemade. I settled on cloth diapers from Sara's registry and a sweet little bunting flag for the nursery.

I knew Sara had chosen to paint her nursery orange -- they don't know the sex of the baby -- so I went to the fabric store with that in mind. I settled on an admittedly girly palette of greens, pinks and oranges. (I was trying to make it gender neutral, but I was surprised at how few fabrics didn't scream GIRL! or BOY!. Plus, what can I say. I gravitate to the girly stuff).


Making a bunting flag is a very simple and satisfying project. All I did was make a triangle template out of cardboard -- I think mine was five inches across and seven inches long. I used the template to trace the flags onto my fabric, then cut them out with pinking shears. I pinned the flags inside some premade bias tape, then used a zigzag stitch to sew it all together.


Sara and Kirk both really loved their present and were so sweet and gracious when I told them I had made it myself. I hope their little baby likes it too.


Wednesday, April 6, 2011

Vogue 8511


I really, really love this dress. It's got a certain something, you know? It's comfortable, chic (if I do say so myself) and it's suitable for everything from a night out on the town to church.

I made this dress for my birthday party in late February and have worn it several times since. It's Vogue 8511 -- a simple, straightforward pattern that came together really easily. I was inspired by a couple versions I saw around the internet, especially here and here. (I also wrote about my plan to make it way back in (October).


The only modification I made was to underline the skirt and sleeves (the pattern only called for the bodice to be lined). I also graded up to a larger size in the hips to accommodate my lady curves. However, this proved to be a bit unnecessary as the whole thing it just a smidge too loose. I plan to make another, more springy version and cut a size smaller. To give it a bit more shape, I've been wearing it with a belt, which has the added benefit of looking very cute.
 
The pattern has really nice details, like princess seams in the bodice and some interesting pleats in the skirt. My only complaint about this floral fabric (which is a random poly blend that drapes really really nicely) is that it drowns out some of those elements. I plan to make it again with solid yellow fabric for the bodice and a solid grey skirt, which will make those details more noticeable.


 I'm especially happy with this dress, because it's been awhile since I've had a real sewing victory. I spent several weeks in late December/early January on New Look 6968 only to find it was a bit of a disaster.  (I mentioned in the same October post as this Vogue pattern). The fabric and the fit were so horrible that I didn't even try to salvage it. It was so depressing -- I consider myself a decent seamstress, so it's frustrating when a project goes totally awry.

My experience with making this dress was the total opposite of the New Look 6968 disaster -- everything came together super smoothly and I absolutely love the final product. Add this one to the 'win' column!

Saturday, December 11, 2010

The $117 couch

This is a story about how this...


...turned into this...


...and the whole thing (couch included) only cost $117.

Several weeks ago, I bought a new couch on Craigslist. There was nothing really wrong with our old couch, but my cats had developed a deep love for scratching it and the upholstery was starting to look a little battered. Plus, it was chocolate brown, which showed every single strand of fur that migrated off of our fluffy kitties.

So, with the help of my strong-armed husband, I gave away our old couch and picked up this one. It was listed for $80, but because of some wear and tear on the wooden bits, I bargained the seller down to $60 ($60!!). I rented a steam-cleaner for $50 and spent an afternoon making sure it was squeaky clean.  (That brings the grand total up to $110, for anyone who's keeping track).

For several weeks, I hemmed and hawed about what to do with the wooden part of the couch. It was chipped and worn and definitely needed to be dealt with in some way, but I didn't want to pay an arm and a leg to have it refinished. Finally, during a free afternoon this week, I decided to seize the day.


I carefully taped off all the edges, then sanded, primed, and painted the wood using some white paint I already had on hand. I used that ridiculously tiny brush to do the whole thing, just so I could be as precise as possible. I had no idea if it would turn out or not, but in the end, I was pleasantly surprised.


I honestly can't believe how well it turned out. I knew I was playing with fire (white paint + beige upholstery = lots of potential for disaster) but I made sure to be very careful with the paint and had some spot cleaner on hand in case I dripped. (Which, of course, I did, but I was able to remove it right away so it didn't leave any permanent spots).

Though most of it turned out really well, there were a couple of places where it looked pretty messy. So, I went out and bought $7 worth of beige cording from Fabricland. I ran a bead of hot glue between the upholstery and the wood, then pressed the cord into the glue to hide all of the not-so-perfect spots.


So, there you have it: a new couch for $117 and a couple hours' worth of elbow grease. I think the white paint makes this couch look so much more modern. I love this style, but it felt a little too grandma-y before the makeover.

Oh, and I also made some new pillows using some Amy Butler and Heather Bailey fabric (some of which I had on hand from other projects, and some of which I bought online). So, I guess this project technically cost me more than $117.


 But having a one-of-a-kind, modern grandma-style couch with fabulous colourful pillows? That's priceless.


Wednesday, December 8, 2010

Wreath-tastic!

I have seen so many cute yarn wreaths popping up all over the interweb lately. Like these ones:
From Take Heart
And this one:
From my internet friend and fellow crafter Creative Kat
So I decided to make my own.


I followed this tutorial to the letter, including the idea to add the little felt flowers. I had the yarn in my stash already and the felt cost about $3 total, so all in all, it was very easy on my wallet. The most expensive thing was the $15 styrofoam wreath form (damn you and your exorbitant styrofoam prices, Michaels!)


This was honestly one of the easiest and most satisfying projects that I've done in a long time. It's basically impossible to screw up. Even the felt flowers, which are the "hardest" part of this project, are very simple and satisfying to make. Plus, the colour possibilities are endless. I made this one to match the red and aqua in my kitchen.


Simple, cute, easy, and inexpensive. What could be better?

Monday, November 8, 2010

My first crochet project

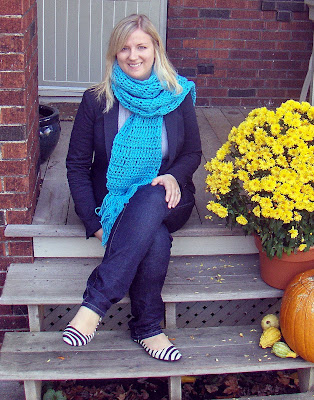
May I present my very first crocheted project: a snazzy electric blue scarf (modeled here with my new zebra-print shoes!)


I mentioned a few posts back that I took a learn to crochet class at Lettuce Knit here in Toronto over the summer. This soft, sqishy scarf is the first fruit of that labour. I used the Funky Chunky Scarf pattern from Crochet Today, which was a great introduction to the craft.


I'm very glad I learned to crochet. I was able to pick it up fairly easily thanks to all of my knitting experience, and it's good to know that I'll be able to tackle a crochet project if anything tickles my fancy in the future. Still, I have to say that knitting is still my first love. Crochet, I think, will probably play second fiddle when it comes to fibre projects.

That being said, I really, really, like this scarf. Even though it's acrylic (which is basically a swear word in fibre-land) it's soft and drapes very nicely. Plus, I can throw it in the wash if I accidentally spill coffee on myself (which happens more than I would care to admit).

I'll leave you with a shot of me lovingly stroking my handiwork. 

 Hellloooo, lovely.


Sunday, September 26, 2010

Lovebirds

My husband and I just celebrated our first wedding anniversary (woohoo!). Since we're actually fairly traditional at heart, we wanted to mark the occasion with something made out of paper.

I was randomly searching Etsy for something appropriate when I came across Dimdi's shop. She does amazing watercolours of animals and graciously agreed to paint one for me and my fella. We chose cardinals, both because they're very common where we live and because they mate for life (which is pretty good symbolism for a first wedding anniversary). Here's what she came up with:


Isn't it pretty? I love the detailing around the tails:


My only problem was trying to find the perfect frame for these little lovebirds. The painting is an unusual size -- 11" x 17" -- and the only frame I could find was the simple black one in the photo above. Nice, but not really special. But since it was super cheap (about $10 for a package of two), I picked it up with the intention of turning it into something a bit more interesting.

I had an idea in mind that I first learned at summer camp as a kid. All it involves is a bit of time, some glue, and a whole lot of twigs and sticks. I started by gluing a couple pieces of cardboard on the back of the frame to give myself a larger canvas, then I hot-glued a whole bunch of twigs onto the base. Finally, I hit it with some white spray paint. Badda-bing, budda-boom.


I gave it one coat of paint and ended up really liking the way some of the natural wood still peeked through. I also finished it with modge-podge to seal it and give it a bit of shine.


This was one of those projects that took a bit of time, but each step was actually very easy. I'm really happy with the way it turned out -- especially because the frame sort of thematically relates to the painting (you know -- birds, nests, twigs, trees, etc).

So, there you have it. A little nest for our first anniversary lovebirds.